← Back to Blog

Top 10 Real Estate Photo Editing Techniques to Enhance Your MLS Site

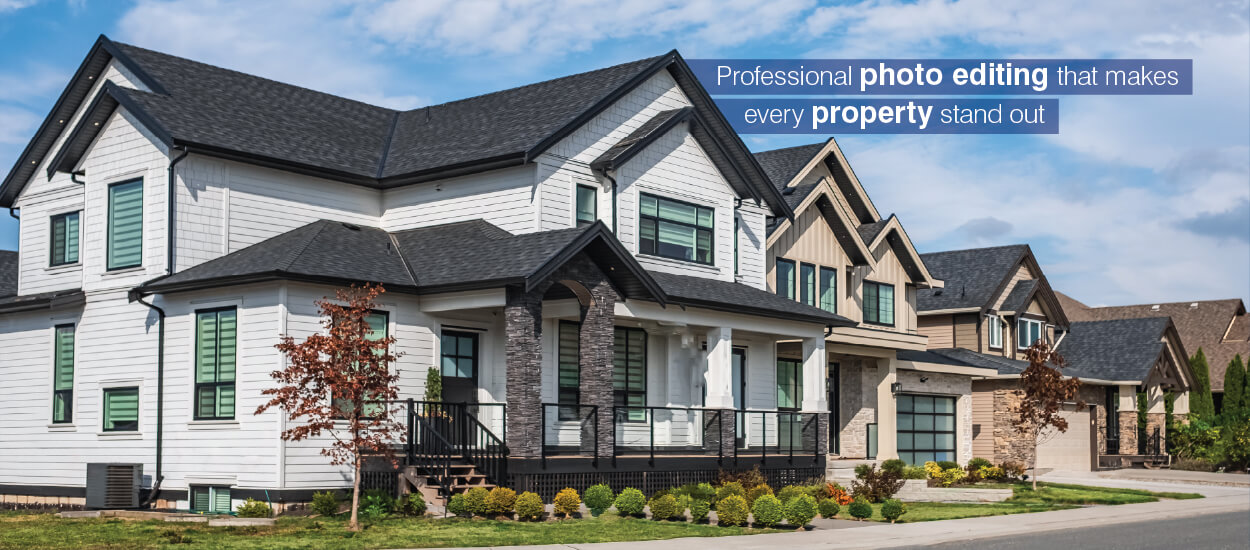
Professional photo editing that makes every property stand out
MLS listings attract buyers based on attractive property images. Raw images need enhancement, and for that, photo editing techniques help level up the image quality. Photo editing and retouching done correctly improve buyer engagement and elevates your site to the next level.

MLS listings that use professionally photographed images get 61% more views than those with amateur images. They also sell for $3,400 to $11,200 more relative to their list prices. Also, professionally edited images sell much faster, while listings with raw images takes more time to get noticed and sell. The gap is never about the kind of camera used; it is about how the raw image is edited and transformed. It is about the quality of real estate photo editing.

Real estate photo editing does basic corrections for consistency with focus on technical accuracy and uniform look. This includes doing color correction, fixing brightness, managing lens issues and any other correction required to align with the MLS platform.

This is also done in bulk where same adjustments are done across many images. This is done to ensure that images comply with the standards set by the MLS and the images look professional without misleading buyers.

It is not the same as photo retouching where specific changes are made to parts of an image, sometimes altering reality. Professional photo editing improves the overall quality of an image without changing its actual content.

This guide will cover 10 real estate photo editing techniques that is used in production-grade MLS pipelines. You will also get to understand the 5 mistakes that must be avoided so that your listings don’t get rejected. The tool comparison and the benefits of outsourcing your projects will also be explained so that you understand the plus and minus of in-house and outsourcing your projects.

Want your property listings to stand out?

Explore techniques  →

Photo editing vs. photo retouching: why the distinction matters for MLS

Both these terms may look similar and are often used interchangeably, but they do have operational and compliance differences. Photo editing does global correction where every single image in the batch is made uniform. Baseline corrections and edits like color temperature, white balance, lens profile etc. are applied to all images in the batch that must align with the MLS platform. Photo editing for MLS sites is a must because formats not aligned with platform will either get rejected or perform poorly.

On the other hand, photo retouching is not something that is done uniformly on all images. It is done selectively only on the images that require retouching. It could be sky replacement, object removal, day-to-dusk conversion or even virtual staging. For a more detailed breakdown of these differences, refer to our guide on A Detailed Guide to Real Estate Photo Editing & Retouching.

We can say that photo editing fixes images technically while photo retouching makes selective changes in image as required.

# Photo Editing Photo Retouching
Scope Applied to every image in the batch Applied selectively to specific images
Operations
  • Exposure
  • Colour
  • White balance
  • Lens profile
  • Sky swap
  • Object removal
  • Virtual staging
MLS status Mandatory baseline Permitted with conditions
When At import, before any selective work After editing pass, on review

10 Real estate photo editing techniques used in professional MLS workflows

Here are the techniques used for real estate photo editing to make images look professional, attractive and aligned to MLS platforms.
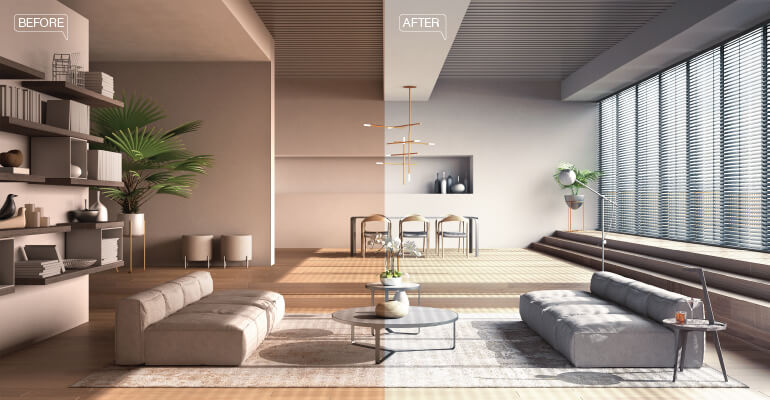
1. Colour correction: fixing casts from mixed light sources

Colour correction: fixing casts from mixed light sources

Mixed light sources like warm tungsten or cool daylight often create an environment that makes the room look dingy, dark or depressing orange. These unnatural colours are not good for MLS platforms as the property may look dull and unattractive.
  • Tools and Settings: Adobe Lightroom with temperature set to 4,500–5,000K can manage mixed-light interiors. HSL (Hue, Saturation, Luminance) is a tool inside Lightroom that lets you adjust individual colors like reducing yellow/orange tones in interiors. Another one, eyedropper, is used for white balance correction.
  • MLS compliance: Colour correction is permitted as per MLS compliance, but the colour enhancement must be realistic. You need to keep vibrance under +25; increasing intensity too much may make the colours look too bright or unrealistic and may mislead the buyers.

2. Perspective correction: straightening converging verticals

Perspective correction: straightening converging verticals

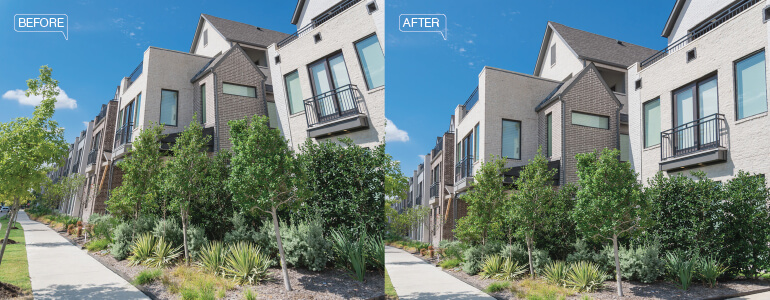
Wide-angle lenses (14-24mm) are often used to photograph wide rooms in one shot, but they can create distortions. These distortions are called converging verticals. When the lens view stretches, it results in distorted images. For instance walls, doors, or windows may appear to tilt inward or seem to be collapsing. The structure looks uneven and may confuse the buyers.
  • Tools and Settings: Tools like Adobe Lightroom and Adobe Photoshop helps in perspective correction. They can easily do it in the transform panel using auto and vertical slider. Adobe Photoshop works with adaptive wide-angle filter that gives wider control for complex distortions. If you see white empty corners after doing the perspective correction, just crop the image. Final framing will ensure that room is fully visible.
  • MLS compliance: Making images look real is totally acceptable. You are just fixing issues like bent lines or tilted walls caused by the camera lens. But again, you need to be careful that you don’t over-enhance the space. The correction should not lead to misrepresentation. Don’t stretch the walls unnaturally. MLS is very strict with images looking accurate and honest.

3. Exposure blending and shadow recovery

Exposure blending and shadow recovery

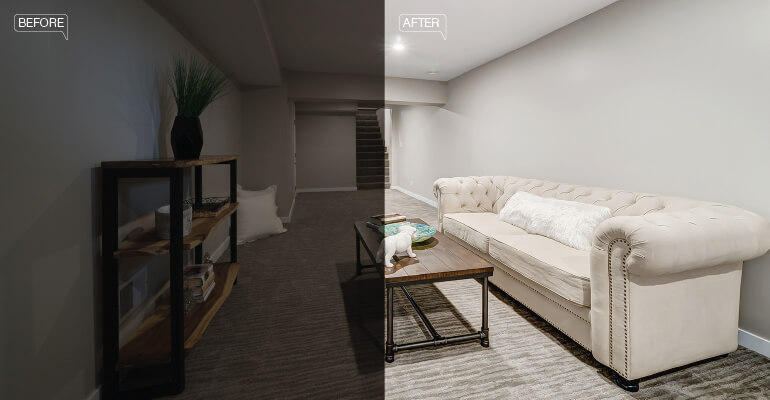
The dynamic ranges of cameras are limited, so they are unable to capture very dark or very bright corners or areas perfectly in one shot. Either one area gets too bright and the other too dark. To handle this, you take multiple photos of the same area at different brightness levels and then combine them into one balanced image. This makes the complete area well-lit and natural looking.
  • Tools and Settings: Shoot 3-5 bracketed shots from very dark to normal to very bright. It could range between -2 EV to +2 EV. Once the shots are ready, they are merged. You either use Adobe Lightroom for HDR merge or set de-ghost for small fixes to tackle motion between shots like a moving curtain or a moving plant or a flickering light. These kinds of motions between shots creates blurry images called the ghosting effect. Another advanced method where you use Adobe Photoshop to manually blend using luminosity masks gives more control over highlights and shadows.
  • MLS compliance: HDR processing is permitted if it is used to show true interior or exterior details, display the space accurately or fix camera limitations. But you can’t show a genuinely dark space bright using artificial lights or hide defects. You are not allowed to show an unrealistic version of the property.

4. Noise reduction: cleaning low-light interior shots

Noise reduction: cleaning low-light interior shots

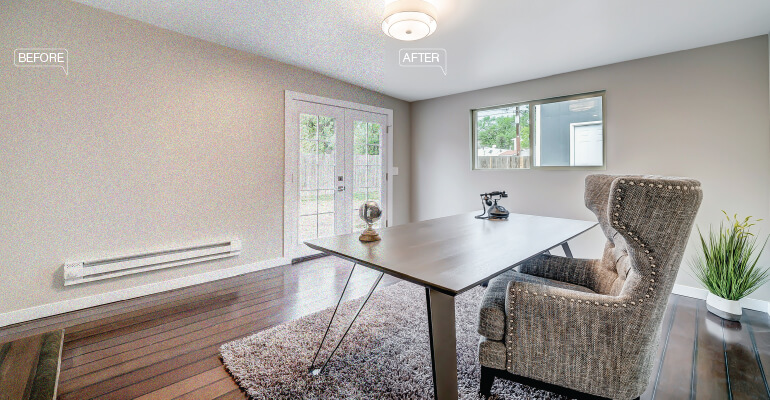
Sometimes when there is not enough light, you shoot at ISO 800 or above. This often introduces noise, a kind of grainy texture that is luminance noise while colour noise appears in random colour specks that could be red, green or blue. Noise gets more visible on walls, ceilings and floors. On MLS thumbnails, this reflects as poor quality and an unprofessional picture.
  • Tools and Settings: Tools like Topaz DeNoise AI and Adobe Lightroom are used for noise reduction. Topaz DeNoise uses AI to detect and remove noise, and Adobe Lightroom applies AI Denoise and Luminance sliders to reduce grain and color noise in RAW images. It is a good idea to apply noise reduction before sharpening so that you enhance real details and not grains.
  • MLS compliance: Noise reduction is permitted as it improves image quality without altering the property. But keep in mind that you don’t go overboard so that the image starts looking artificial.

5. Image sharpening and clarity adjustment

Image sharpening and clarity adjustment

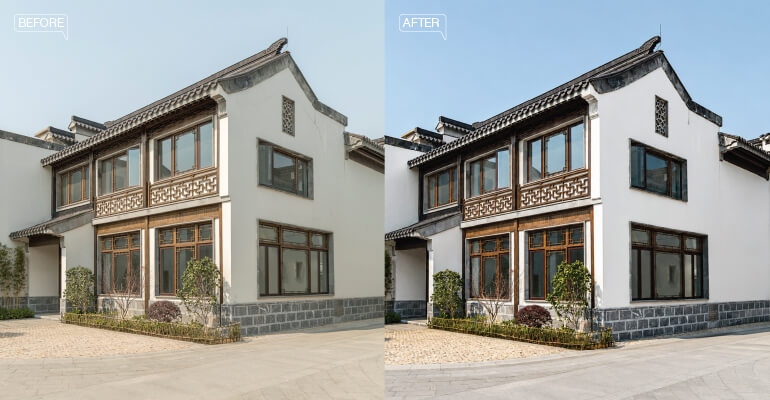
Noise reduction can make your images look soft; that is why sharpening is needed to restore the crispness of the image. The details like doorknobs, frames, furniture edges all must look clean, well defined and sharp.
  • Tools and Settings: Software like Adobe Lightroom and Adobe Photoshop is used for image sharpening. You can use features such as transform panel, HSL panel or HDR merge. Keep the amount 60-80, luminance 30-50 and clarity +10 to +20.
  • MLS compliance: Don’t overprocess and enhance edges, not noise. Keep the image clean, sharp and realistic. High clarity creates harsh HDR look and may get flagged in MLS.

6. White balance, hue, and saturation: setting the perceptual tone

White balance, hue, and saturation: setting the perceptual tone

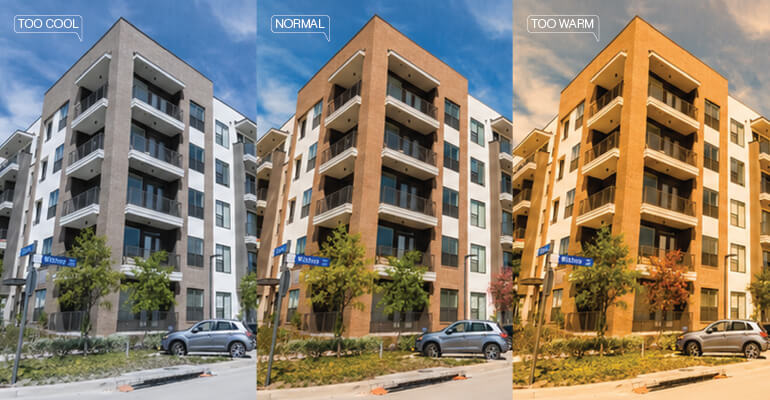
Colour adjustments are important as balance and colour settings enhance the space. Creating a warm space looks outdated while cool one may feel sterile. If colour adjustments are not done correctly, it can distort the real look of materials and surfaces.
  • Tools and Settings: To keep the space attractive for buyer’s white balance and HSL adjustments can be used to get the right feel. Warmer tones (3,200–4,000K) create a cozy residential feel, while cooler tones (5,500–6,500K) suit modern listings in Adobe Lightroom. You can also enhance greens and aquas, but keep reds and oranges neutral to maintain accurate, natural-looking materials.
  • MLS compliance: There is permission to make enhancements within rules and reasons, but the correction should not be exaggerated. It should be close to how the property looks. Misrepresentation using colours like orange or red may mislead buyers. They may assume the finishing to be of materials like brick or wood.

7. Lens correction: removing barrel distortion and chromatic aberration

Lens correction: removing barrel distortion and chromatic aberration

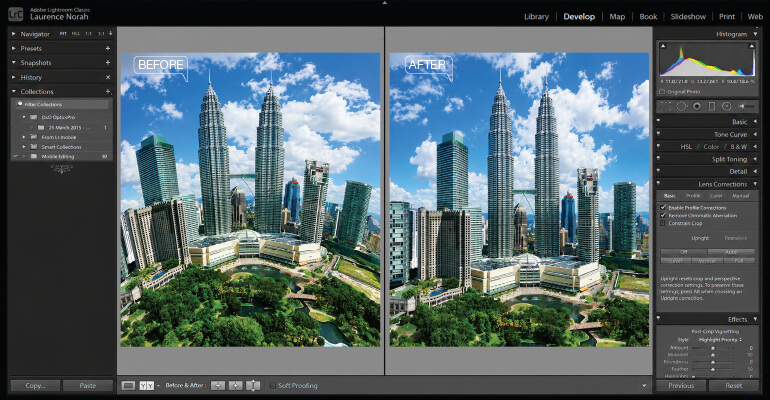
Barrel distortion bends straight architectural lines outward, and chromatic aberration creates fringes. These are lens related artefacts and distorts the property image quality. The image looks poorly captured, as often green or purple fringes appear along high-contrast edges like windows that are placed against bright skies.
  • Tools and Settings: Adobe Lightroom has the capability to enable profile corrections. Profile corrections can be done using correct lens profile to fix distortions. Defringe eyedropper removes colour fringing along edges.
  • MLS compliance: Lens correction is permitted and it easily restores natural geometry and removes optical artifacts. Keep the adjustments balanced so that they do not change any structural proportions. This may lead to misrepresentation, and MLS may flag it.

8. Object removal and reflection elimination

Object removal and reflection elimination

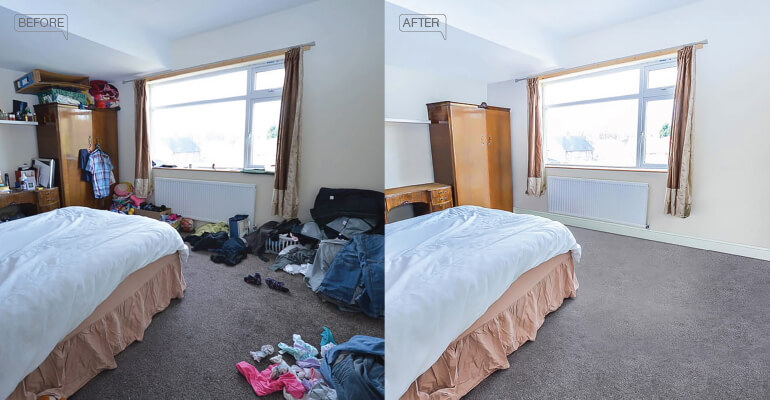
The visual appeal of any property often becomes lost due to various objects like bins, cables, pots etc. that may distract the buyer’s attention from the main property. The space starts looking cluttered, reducing the visual appeal. Such distractions can easily be removed using object removal techniques.
  • Tools and Settings: Generative Fill, an AI-enabled feature in Adobe Photoshop enables you to add, remove or replace the things causing clutter easily. It doesn’t remove objects randomly. It uses intelligence and matches the surroundings so that the space looks natural. Smaller distractions can be handled using Healing Brush in content-aware mode. But be careful that you edit on a duplicate file so that you have the original to compare.
  • MLS compliance: Removing such clutter that is there in the space as distraction is fully permissible. What is not allowed to be removed are permanent fixtures that may misrepresent the space and may lead to compliance actions or loss of buyer confidence.

9. Sky replacement and lawn enhancement

Sky replacement and lawn enhancement

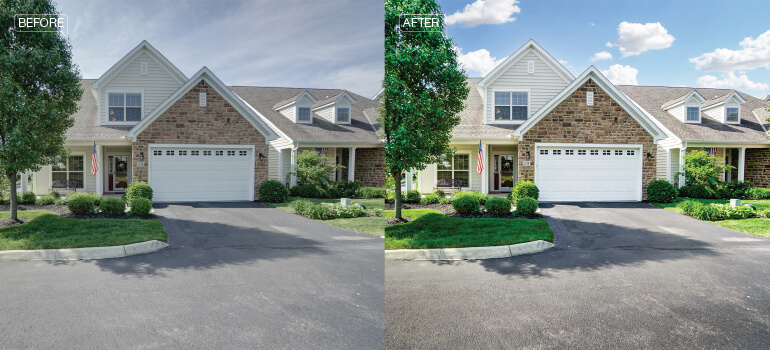
A good exterior visual appeal is important for creating a good first impression. Often weather conditions or the time of the day creates situations which is not ideal for impactful photography. The sky may look dull and lawn may look patchy. This makes the whole image unattractive. And buyers may just move to the next listing. Sky replacement and lawn enhancement can help present the property in most suitable conditions that attract buyers within seconds.
  • Tools and Settings: This can be easily done using Photoshop’s sky replacement tool. The tool automatically detects sky and blends lighting and colour. It works for complex scenes where the rooflines are uneven with chimneys or tress around. For clean rooflines luminance masking works well. For lawn enhancement Hue/Saturation adjustment does a good job. This restores the natural green texture of lawns.
  • MLS compliance: This is permitted and does not create any compliance issue provided it is done keeping the geography and season in mind. Like you cannot show a summer sky over snow covered property.

10. Virtual staging: furnishing vacant properties digitally

Virtual staging: furnishing vacant properties digitally

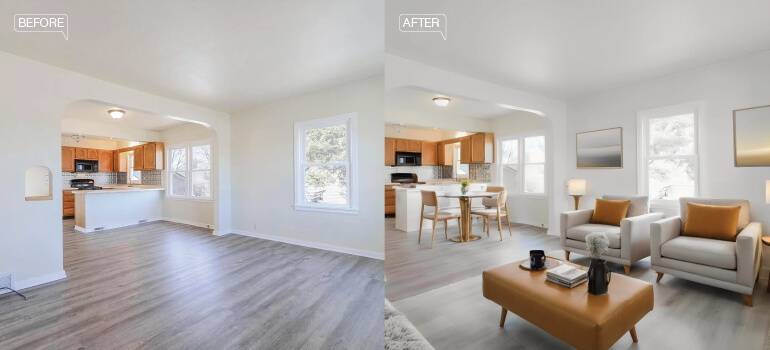
Vacant space doesn’t give any idea to the buyers about the layout or the scale. Moreover, it looks cold and not liveable. Staged spaces look warmer and also give the buyer a clearer idea about the space. They can easily visualise the furniture fit, estimate scale, and how the space can be used. It also gets your listing more clicks.

  • Tools and Settings: There are many service providers that provide virtual staging services at affordable costs and with quick turnaround times. Virtual staging services can deliver realistic, high-quality results at a cost-effective price point.
  • MLS compliance: Virtual staging is permitted for listing sites with a disclosure label. It should clearly state that it is virtually stages. Failure to disclose may result in non-compliance and the MLS site can be penalized. Also, there should not any structural change made in the property.
  • MLS portal operators: High-quality property images are only one component of a competitive listing. Accurate, enriched MLS data – standardised field mapping, geo-coded parcel data, and complete property attributes—determines how listings rank in portal search results. MLS data aggregation and property data enrichment services work alongside professional photo editing to improve listing performance.

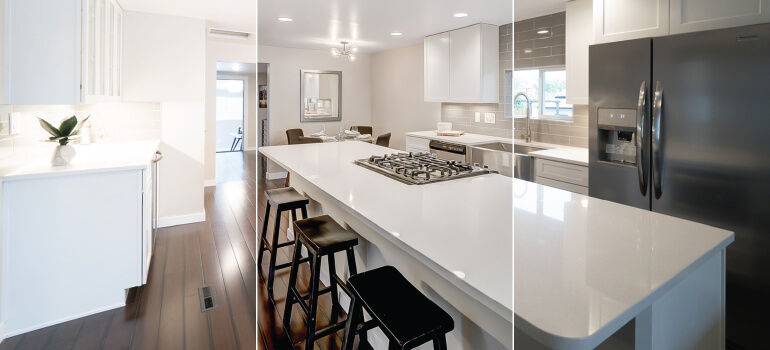
Applying these techniques together for best results.
Explore more  →

Flambient editing: Emerging professional interior standard

Flambient editing: Emerging professional interior standard

Interiors often have mixed lightings where both natural and artificial lights get mixed which single exposure can’t handle. Flambient combines both to create balanced lighting. It preserves natural colours, giving realism matching human perception.

Workflow: Two photos of the same scene is taken. One in natural light and the other flash-lit. The ambient shot is taken in ISO 400-800 while the flash one at ISO 100. Both shots are blended in Adobe Photoshop using masking. It takes extra time, maybe 10-15 mins per room and is used mainly for key/hero images, not all photos.

5 Mistakes that get MLS listing photos rejected

We just discussed different photo editing techniques and the compliance needs. Even after being careful often compliance violations happen, and that is not always from misrepresentation. They are often workflow oversights that could have been prevented. To minimize these risks, it is essential to follow a defined set of editing standards. Here are 7 real estate photo editing rules for better MLS listings.

  • Wrong image dimension and format: MLS boards have their own specifications for the images to be uploaded. If you don’t follow the specifications, your images gets rejected. Check the technical specs for the platform before you start editing and not at the time of submission. Most platforms usually require 2048×1365 pixels, JPEG format, 72 DPI, 4:3 aspect ratio.
  • Removing permanent fixtures: If there is a major discrepancy between what you showed the buyer in the image and what he sees physically, then it is a huge compliance issue. You can’t remove or cover any structural damage, tile cracks or even stains. Doing this violates CRMLS Rule 9.2 and equivalent rules at most regional boards.
  • Inconsistent colour temperature across a gallery: If your editing is not consistent and you don’t follow a standard workflow; the images look unprofessional. You can’t have one room yellow and the next one blue. Such images get rejected by the MLS platform, and even the buyers notice the discrepancy. You should use a single preset in Adobe Lightroom as a starting point and then adjust as and when needed.
  • Unmarked virtual staging: It is mandatory at US MLS boards to disclose the use of virtual staging. The buyer needs to know that the furniture is not actually there and that it has been placed through virtual staging. Whether intentional or accidental, non-disclosure is penalized. Not disclosing can be misleading.
  • Over-processed exteriors: Any editing that exaggerates the exteriors is not acceptable and can lead to non-compliance. The exterior must look real and natural. Overediting can mislead buyers. Say you did oversaturation of the neon green grass and that makes the lawn look unreal, or the blue of your sky doesn’t match the real weather at that location.

Find out more about these issues in our blog top 5 real estate photo editing mistakes that hurt property listings.

What tools do professionals use for MLS photo editing?

There are multiple tools available for your photo editing. Based on your editing needs you may choose the one best suited. It is important to select the most efficient one.

Tool Primary use case AI features
Adobe Lightroom
  • Batch editing
  • Presets
  • Colour correction
  • Lens profiles
  • AI Denoise
  • Auto Masking
  • Select Subject
Adobe Photoshop
  • Object removal
  • Compositing
  • Flambient blending
  • Generative Fill
  • Neural Filters
Topaz DeNoise AI Noise reduction for interior low-light RAW files Fully AI-driven noise model
BoxBrownie
  • Outsourced retouching
  • Virtual staging
  • Day-to-dusk
AI-assisted with human QC
Styldod
  • Virtual staging
  • Full-edit turnaround for agents
AI + human editorial review

In real estate photo editing, each tool has a specific role like Adobe Lightroom is built for batch editing, and Adobe Photoshop is built for detailed, single-image editing. Even the best of tools has their limitations. Automations have limits and there is always a risk of over-editing. Managing large volumes with precision is difficult in-house.

Outsourcing to experts where the editors understand compliance, editing rules, and even buyer psychology always works best for any kind of real estate photo editing.

How outsourcing real estate photo editing impacts costs, turnaround, and fit?

Automation and presets work well in photo editing but in real estate, we must be careful not to misrepresent. Some rooms may require manual correction. For example, North facing rooms that get cool light, tend to look grey and cold. They need manual white balance adjustment and can’t be corrected using presets alone. An open kitchen with mixed lighting sources has different colour tones and here again presets fail and they need selective corrections. These kinds of things happen in most residential shoots.

It is important to understand and identify such issues before the editing begins so that the workflow can be aligned accordingly and you don’t waste time, effort and money on second round of corrections.

The build-versus-outsource decision for MLS photo editing is primarily a volume calculation. To understand the broader impact, read top 7 reasons why you need real estate photo editing services.

Edit type Standard turnaround Cost range
Standard batch edit (colour, exposure, lens) 24 hours $0.50-$2.00 per image
Retouching (sky replacement, object removal) 24-48 hours $2-$5 per image
Virtual staging 48-72 hours $20-$30 per image
Virtual staging 24-48 hours $4-$10 per image
Flambient post-production (per room) 48 hours $8-$15 per image

It is a simple calculation. If you handle less than 10 listings/month, in-house editing is manageable, but when volume increase outsourcing saves 3–6 hours per shoot. You also save on software costs and can manage better. But keep this in mind that even while outsourcing, you need to keep a check on the quality. Review for quality and compliance is mandatory whether you don it in-house or outsource.

Find out how property images captured by 20+ photographers were post-processed to resolve imperfections in the raw images.

Real estate photo editing and retouching services are designed to deliver 24–48-hour turnaround, MLS-compliant outputs, and scalable capacity for high-volume portal operators.

Ready to improve turnaround without delays?

Explore options  →

Beyond photos: the role of listing data quality in MLS performance

The listing photos can only get the buyers to click on your site, but it doesn’t end there. There is more to the listings than just an image. It is more about the data. A listing portal with the best of images and poor-quality data will never bring conversions. Complete, accurate data helps listings rank higher in search.

Missing information on square footage, amenities or inconsistent data can pull your listing down in search results, as search algorithms prioritize complete and structured data. This is a big issue faced by real estate companies and MLS platforms.

The operational areas where data quality failures affect MLS listing performance most:

  • Field standardisation: When different listings use different formats it becomes difficult to compare and group properties accurately. Standardizing data ensures proper comparison and accurate search results.
  • Geocoding and parcel mapping: If location data is missing or wrong, property may not appear correctly on maps. Most buyers search using map view (especially on mobile). Accurate mapping ensures accurate search results.
  • Property data enrichment: Missing details like HOA status, Zoning, district etc. would fail the filtered searches. Listing won’t appear in many filtered searches

MLS data aggregation, property data enrichment, and parcel mapping services are designed for high-volume portals, with pipelines aligned to RESO standards, field-level validation, and structured delivery timelines.

Conclusion

Real estate photo editing plays an important role in capturing the attention of potential buyers and enhancing the visual appeal of properties. Although several techniques are used for editing photos, a proper understanding and expertise in photo editing is a must to showcase properties in the best light.

Looking towards the future, one can expect further advancements in photo editing based on AI-based modifications, quick editing techniques, and transition to 3D visualizations and AR.

Hitech BPO has long experience in real estate photo editing. And as AI tools begin to level the field, it is the human expert who will spell the difference. Our skilled professionals can spell the difference between buyer engagement and disappointment.

FAQ

    • Yes, sky replacement is allowed by most MLS platforms provided it does not mislead the buyers. Often due to weather conditions, or not getting the right time schedule for shooting, you don’t get the image you are looking for. In such conditions, you can always use this technique to get the right sky colour. But yes, you must ensure that the sky remains realistic. You can’t show a blue sky over a snow-covered property. Also, you may check if your region has any specific guidelines to be completely sure.
    • General guidelines say that you should have a minimum of 1024×768 pixels and 20448 px on the long side. Aspect ratio should be 4:3 or 3:2. Too small resolution may make the image blurry, while too large a resolution may get compressed and rejected. Different boards may have different requirements, and it is always a good idea to check the specifications before you start editing.
    • HDR (High Dynamic Range) combines multiple ambient shots (different exposures). It is done entirely in post-production with no extra equipment needed. It is best for exteriors and is fast with easy workflow. Flambient (Flash + Ambient) on the other hand combines ambient and flash shot that requires off-camera flash and works best for interiors or mixed and difficult lighting. HDR is faster and software-driven, while flambient uses flash for more accurate, professional interior results.
    • Basic turnaround time for simple editing like color correction, cropping etc. is usually 12-24 hours. Advanced editing like flambient, object removal etc. may take 2-48 hours. It all depends on the volume and complexity of your projects. For very advanced or bulk projects, the turnaround time may move up to 2-72 hours. But if you have any urgent requirement, then it can be considered under rush delivery and accordingly cost and time is adjusted.
    • Standard batch editing runs $0.50–$2.00 per image depending on volume and complexity. Virtual staging is $20–$30 per image. Day-to-dusk conversion is $4–$10 per image. Flambient post-production is $8–$15 per image. At volumes above 500 images per month, most providers offer volume pricing that reduces the per-image cost by 20–40%. For operators running continuous MLS feeds, a retainer model is typically more cost-effective than per-job pricing.
    • No, AI cannot replace human editors. AI can handle repetitive batch tasks with speed, do auto white balance and basic exposure correction. But they cannot make judgement-based decisions such as compliance checks, realistic virtual staging or even flambient blending. These require human understanding and experience. Use AI for initial batch editing and humans for final review and retouching.
Author Snehal Joshi
About Author:

 spearheads the business process management vertical at Hitech BPO, an integrated data and digital solutions company. Over the last 20 years, he has successfully built and managed a diverse portfolio spanning more than 40 solutions across data processing management, research and analysis and image intelligence. Snehal drives innovation and digitalization across functions, empowering organizations to unlock and unleash the hidden potential of their data.

Let Us Help You Overcome
Business Data Challenges

What’s next? Message us a brief description of your project.
Our experts will review and get back to you within one business day with free consultation for successful implementation.

image

Disclaimer:  

HitechDigital Solutions LLP and Hitech BPO will never ask for money or commission to offer jobs or projects. In the event you are contacted by any person with job offer in our companies, please reach out to us at info@hitechbpo.com


popup close