Top 7 Real Estate Photo Editing Mistakes That Hurt Property Listings
Snehal Joshi
May 7th, 202616 min read
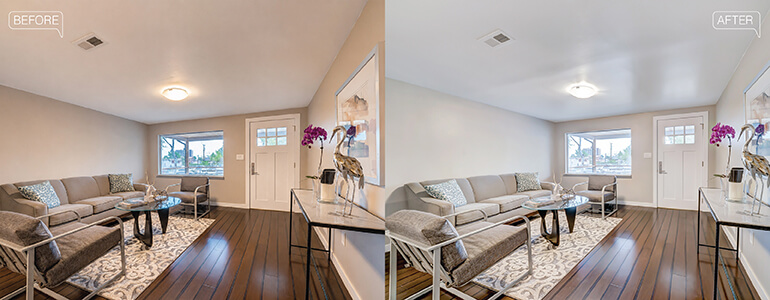
Poor real estate photo editing can reduce buyer interest in listings. However, amateur work and photo editing mistakes like oversaturation, poor white balance, or perspective errors affect credibility. Natural, consistent looking professional images help overcome buyer trust issues and improve property viewings and visits.
Imagine a prospective home buyer scrolling Zillow at 9 p.m. who decides in under 5-10 seconds. They don’t read the property description first. They don’t check the square footage. They look at the property photos.
But what if the kitchen counters look orange, the windows are blown out to white, and the lawn looks neon green. The client will scroll past. Not because the property fails to meet their criteria, but because the photos fail to hold their attention.
A National Association of Realtors’ 2024 research, suggests that 87% of buyers confirmed that property listing photos determined which homes they visited. These numbers get cited constantly, but the negative impacts are rarely stated directly. Yes, photo editing errors have a direct, measurable effect on listing traffic and showing requests.
The National Association of Realtors (NAR) Code of Ethics states that all advertising from agents should be truthful. Since property listing photos are considered an advertisement by NAR, if an MLS platform identifies any obviously altered images, those images may be flagged as inappropriate.
In addition, in many areas of the country, listing agents who have caused buyers to rely on false information when making purchasing decisions may be liable for the damages to the buyer.
Acceptable
Non-acceptable
Adjust brightness/contrast
Correct color temperature
Remove minor distractions
Replace gray sky
Remove water damage
Add walls/windows
Remove permanent fixtures
Change house color
There is also a simple test to use on each photo. Ask yourself:
Does this photo show my client’s property accurately?
Does overediting property photo shows me a version of my client’s property that never existed?
If the answer to either question is yes, your real estate photo editing has created liability for both you and your client and will create distrust from potential buyers as soon as they enter the home.
Platforms listing properties and providers of MLS Data:
MLS Data Providers and Platforms using MLS Data (whether aggregating the data, providing the original data or repurposing the original data) have the same obligations as Agents. That means that if you are distributing misleading property visuals without disclosing what edits were made, you may also have compliance issues within your data stream.
Want listing photos that actually drive more viewings?
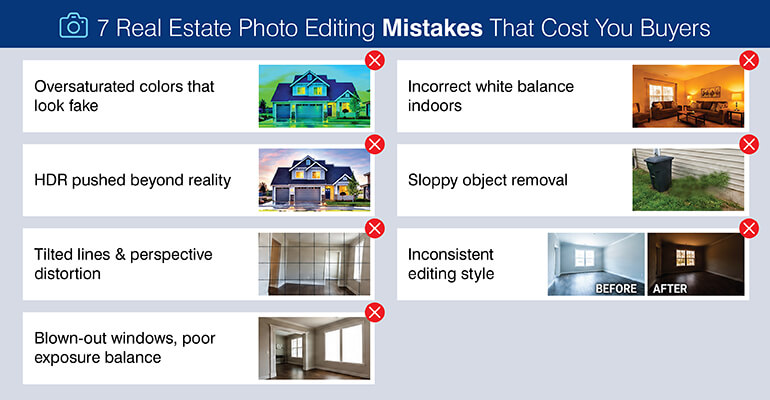
The 7 most common real estate photo editing mistakes
The mistakes made by errors one through four can be easily seen upon first view (the kind of error that will result in the buyer skipping the listing) while the mistake(s) made by errors five through seven may occur at some point in time after the viewing of the photo, possibly during a closer inspection of the photo(s), or even more so when the actual property does not represent what the buyer has viewed online.
Both types of errors will cost you money; however, they will cost you money at different times within the conversion funnel.
Mistake 1: Oversaturating colors until the property looks fake
Oversaturation occurs when the saturation or vibrance slider is greater than +40 within lightroom, resulting in grass appearing as a bright Neon Green, Skies appear Electric Blue and Interior Walls show a color that exists nowhere within the Physical Room.
Most editors who make these types of edits confuse visual impact with visual accuracy. While saturated images tend to attract more initial views from potential buyers, once the buyer recognizes an image has been altered, the attention toward the image immediately turns negative.
An example would be if an editor had enhanced a Kitchen Countertop to Warm Orange and the Backsplash to Vivid Teal, it is perceived just as an Instagram Filter. This type of editing signifies that “Someone is Selling Not Showing.”
How to Fix in Lightroom
In order to correct oversaturation, adjustments should be made in Lightroom’s Color & Hue / Color panel instead of adjusting the Global Saturation Slider.
Adjustments should be made specifically to individual channels. Examples of such channels include:
Channel Saturation (Orange): −15 to −30 for Interior Walls/Wood Tones
Channel Saturation (Aqua): −10 to −20 for Exterior Sky/Pool Shots
Vibrance Slider: Cap Maximum Adjustment @ +20
Validate your work by using the Eyedropper on a Neutral Surface i.e. White Ceiling/Gray Concrete Floor to ensure the color alteration has been removed.
Legal Considerations
When the editor alters the wall color to a non-existent color (i.e. if the Buyer recognizes that the Wall Color shown in the Listing Photos was NOT actually present in the subject Property) it could potentially lead to Buyers filing Complaints and/or Arbitration against their Realtor/Agent for misrepresentation.
Mistake 2: Pushing HDR to the point of misrepresentation
Excessive HDR photo errors occurs when multiple exposure brackets are merged at full opacity, producing halos around windows, flattened material textures on walls and flooring, and an image that reads as rendered rather than photographed.
HDR processing is part of standard real estate photography post-production workflow. Problem is the degree. When blend layers are left at 100% opacity, algorithm will overcompensate: window edges glow, hardwood grain disappears and image loses the sense of depth that makes room feel like you can live there.
Before selecting approach for HDR processing technique, know how they compare and contrast with each other.
Understanding your HDR options
Technique
What it does
Best for
Main risk
HDR blending
Combines multiple exposures to balance highlights and shadows
High-contrast scenes with bright windows and dark interiors
Can look unnatural or over-processed if not done carefully
Flambient
Blends flash and ambient light images for accurate colors and lighting
Professional real estate photography with natural color accuracy
Time-consuming and requires skill in shooting and editing
Single RAW
Uses one RAW image and adjusts exposure, color, and detail
Quick edits and simple lighting conditions
Limited dynamic range compared to multi-image techniques
For most interior shoots with mixed light sources, flambient creates cleaner results than HDR especially around windows. Flash exposure handles interior surfaces while ambient layer handles window light and blend avoid halo issues entirely.
If HDR is the only option available: reduce the merged layer’s opacity to 60 – 75% and blend back with the base exposure. In Lightroom, keep Dehaze at +20 or lower. Before exporting zoom to 100% and check every window edge for halos. Pull Highlights down in masked window area if needed.
Mistake 3: Ignoring perspective distortion and tilted verticals
Distortion due to perspective occurs when using wide-angle lenses which will create convergence or tilt of vertical lines such as door frames, wall edges or window reveals. This creates an apparent structural irregularity within the space that makes the room appear less than its actual size.
The use of wide-angle lenses (in most cases 16-24mm full frame) in real estate photography is common since it makes a room appear larger. However, this method also causes keystone distortion, where straight vertical lines “bow” inward at the top of each image.
It’s possible for buyers to unconsciously recognize the distortion and may feel the room has been distorted. In higher-end listings, a buyer may interpret the distortion as an error in the quality of the professional listing photography.
Correcting distortion in Lightroom:
Go to the Transform Panel.
Select Guided Upright.
Draw two vertical guides on the images along the edges of either the door frames, wall edges or window reveals.
Lightroom will automatically apply the correction.
Adjust the vertical slider to refine the vertical alignment.
Crop out white border areas once you have corrected the images.
Correcting distortion in Photoshop:
Go to Filters.
Click on Lens Correction.
Open the Custom Tab.
Set your Vertical Perspective to 0.
Create a Camera Raw Smart Object Layer so that you can edit the photos without damaging them.
Be aware that if you correct too much, then your images will show walls as being mathematically vertical rather than visually and geometrically accurate – similar to what you would see in an architectural drawing.
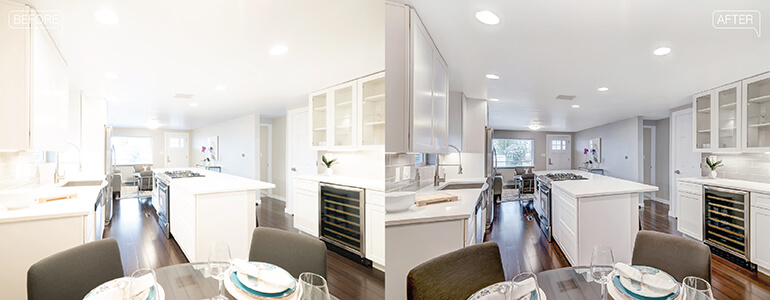
Mistake 4: Blown-out windows and unbalanced interior exposure
A blown-out window happens when you have the correct interior exposure as well as a 3-5 stop difference of brightness from the interior to the exterior daylight coming into your windows. This creates clipped windows that are completely white and eliminate all architectural detail at the frame.
This is a physical limitation of capturing an image and has nothing to do with how you take the picture; it’s something you will be able to address after the fact in editing.
Standard Lightroom Workflow:
Open the Masking Tool (M) and select “Sky” to automatically identify the window area or create a linear gradient mask.
Within the Mask, adjust the Highlights to -80, Whites to -60, and Exposure to -1.0.
Press ‘J’ to enable the Clipping Warning Overlay, and look for any remaining red areas within this layer that require additional reductions.
For properties where there is a visible detail on the exterior side of the window, take an individual shot of the window (capture the outside). Then combine these two shots together in Photoshop using a Luminosity Mask.
The question about replacing skies: If shooting on an overcast day and you replace a gray sky with another neutral and realistic gray sky for the time of year and location of your shoot, then replacing a gray sky is perfectly fine.
However, if you replace a gray sky with a dramatic sunset or clear tropical blue for your property in a colder climate, then you are misrepresenting the property.
Use the Histogram to quickly check that neither end is clipped prior to exporting; in Lightroom, press Cmd + Shift + H to turn on the Dual Channel Clipping overlay.
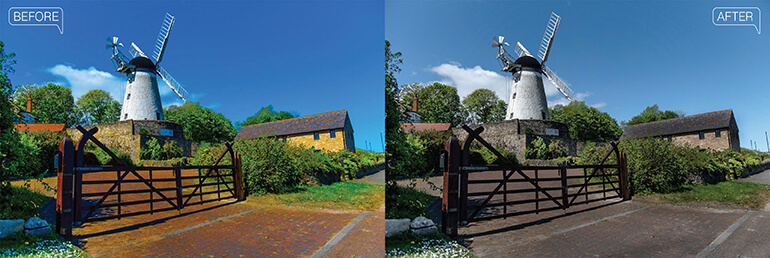
Mistake 5: Incorrect white balance and unnatural color casts
Incorrect white balance occurs when the color temperature of the edited image doesn’t match the dominant light source, producing an orange-yellow cast from uncorrected tungsten fixtures or a blue-grey cast in rooms lit primarily by daylight through north-facing windows.
Interior shoots present a compound light source problem that exterior photography doesn’t. A typical living room runs ceiling fixtures at 2700K–3000K (warm amber) alongside daylight through windows at 5000K–6500K (cool blue-white). Auto white balance averages these sources, which usually means neither the walls nor the shadows look accurate.
The precise fix:
Set a custom Kelvin value based on the dominant source: 2700K–3200K for rooms primarily lit by warm overhead fixtures; 4500K–5500K for daylight-dominant rooms.
Use the Eyedropper on a neutral surface-a white ceiling, stainless steel appliance, or grey carpet-to set the Tint correction.
In the HSL panel: reduce Orange Hue by 5–10 points to neutralize warm wall tones; reduce Blue Hue by 5 points if shadows read cool.
Final validation: compare the edited wall color against the listing description. If the spec sheet says “greige” and the photo shows orange, the white balance is still wrong.
White balance errors are the most common source of buyer disappointment at the showing stage. The walls look different. The flooring looks a different shade. The kitchen reads warm online but cool in person. These gaps chip away at trust faster than any other editing error because they feel like deliberate misrepresentation, even when they aren’t.
Mistake 6: Sloppy object removal that reveals the edit
Using poor object removal techniques, such as Content-Aware Fill or the Clone Stamp tool can leave you with repeating patterned textures; blurry spots where objects once existed; missing shadows; and broken reflective flooring. This tells any savvy viewer that your image has been edited.
While removing objects is acceptable and even legal, it must be done with some boundaries. For example, removing a trash barrel from a driveway or pictures off the walls in a house to stage the home in a vacant condition is a way to show a vacant home as opposed to a lived-in home.
As long as you do not alter anything that would affect the structural integrity of a home; i.e., cracks in plaster, water stains, wetness, etc. – you are fine. These are considered disclosure items and should be disclosed by the seller – not something you would hide during staging.
Most likely, the biggest mistake people make while attempting to remove objects is using the Spot Healing Brush for large area removals. The brush tends to sample from too small an area and creates “tiles” on smooth areas such as hardwood floors, tile, and concrete.
The right method for object removal in Photoshop:
Lasso Select the object loosely so that about 20-30 pixels of the area around the object is included.
Click edit -> content aware fill.
In the sampling canvas create a mask over all areas that have very distinct directional patterns (e.g., woodgrain or tile joints) so that they don’t get repeated into other areas of the image.
Once you accept the fill, use the Clone Stamp at approximately 15-25% opacity to blend the texture back together by hand – especially along the seams of floor tiles and baseboard lines.
If the removed object cast a shadow, remove that too; otherwise the removed area will look as though it was hit with sunlight and will appear darker than the rest of the room because there is no longer a light source.
Check if the removed object had a reflection – on shiny floors or surfaces – that must also be removed.
An easily detectable cloning job is worse than having left the object alone. If a buyer sees an obviously cloned patch – they will assume that there may be much more wrong that you’re trying to hide.
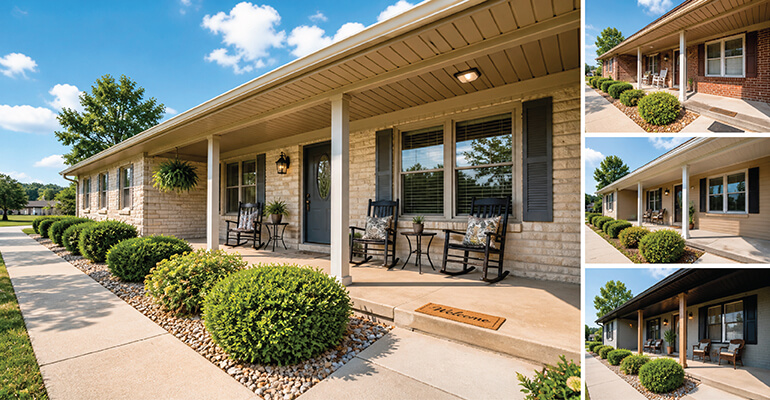
Mistake 7: Inconsistent editing style that makes a listing look amateurish
Editing inconsistency arises when separate images in a listing have been edited without referencing a common preset; e.g., a warm-toned kitchen photo is followed by a cool-toned bedroom photo, or a bright-toned outside photo is followed by an under-exposed inside bathroom photo.
Buyers view a listing as an uninterrupted flow of photos from start-to-finish. When there is inconsistent color-grading across those photos, it breaks up the uninterrupted flow of the listing into fragments.
At best, this will undermine any brand identity established through consistent styling by the agency; at worst, buyers may assume that the different photos were shot at different times with varying lighting conditions.
Operational Fix: Preset-Based Workflow:
Create or purchase a set of Lightroom presets specifically designed for use in Real Estate: one interior preset, one exterior preset and possibly one for baths (due to chrome and tile needing a lower white balance).
Use the applicable preset as your first edit on each photo prior to making any edits to the photo individually.
Switch to Library module prior to exporting your files. Review all images as a grid at the same zoom level. An individual photo can look great, but its brightness or color relative to surrounding shots can reveal itself when viewed side-by-side.
For outsourced batches: Include a reference image and a style guide that outlines what you want, including a desired color temperature range (e.g. interior spaces should be within 3200k – 3800k), maximum sharpness etc.
Looking to scale your property photo listings with consistent visuals?
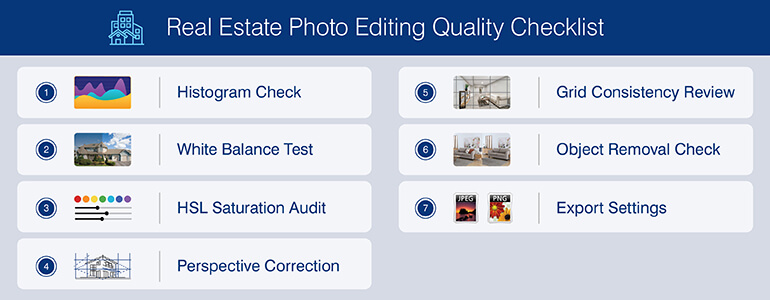
This is a pre-delivery checklist that should be performed prior to delivering any image set of real estate. Performing the complete checklist will add about 12-15 minutes of processing time per image. This amount of time is less than what would have been spent revising each error that reaches the client.
Histogram check: no clipping at both ends (in Lightroom click j for dual channel overlay)
Neutral surface white balance test: use the Eyedropper tool on a white ceiling or gray floor. 12. HSL saturation audit: no single channel over +30.
Transform panel perspective check: every wide-angle interior shot.
Grid view consistency review: all images together in Library module prior to export.
Object removal, shadow/reflection check.
Export settings: long edge – 1920px; color space: sRGB; JPEG quality: 85-90%; export for MLS upload.
Case Study: Solving High Volume for a U.S. Real Estate Photographer
U.S.-based real estate photographer and video producer had twelve to fifteen listing shoots weekly; all the workflow was done by an individual (part-time) who would edit each photo one-at-a-time. There was no preset system, and no standard reference used as a white balance.
All of this created very predictable issues: varied color treatment across multiple listings, occasional “HDR” over-processed photos, and regular delays to meet the agents’ required 48-hour upload deadlines.
As part of its services, HitechBPO implemented following three changes:
Developed a Lightroom preset set that matched the specific camera equipment used by the photographer and common lighting conditions used (Florida bright daylight exteriors, mixed light condominium interiors, low-light luxury bathroom shoots)
Established a standardized two-exposure process for interior photography-one exposure for surface area of rooms, another exposed to capture the windows/exteriors-then combined these exposures after post-processing using luminosity masks
Added a batch quality assurance check prior to delivery, utilizing the same grid view review format as the export checklist below with six items.
The results included: consistent visual treatment throughout each listing within a single batch; 24-hour turnaround time on standard volume batches; and a documented reduction in request revisions. The photographer’s time has moved from postproduction to shooting and acquiring clients.
The seven most common real estate photo editing mistakes – Over-Saturation, Excessive HDR, Perspective Distortion, Incorrect White Balance, Blown-Out Windows, Poor Object Removal, Inconsistent Styling – each of these is caused by an identifiable, correctable factor; none need new photos shot. All are correctible via the workflows described in this article using Lightroom or Photoshop.
Listings utilizing real estate marketing visuals which have been properly edited will receive more qualified showings, produce fewer ‘disappointment’ gaps between the buyer/renter’s on-line viewing experience and their in-person view of the property, and provide less potential liability for Listing Agents.
Maintaining that standard at high volumes can best be accomplished by establishing a disciplined in-house process or by partnering with an established editing provider.
Hitech BPO provides real estate photo editing services for image correction and delivers all edits within 24 hours for standard batch sizes-with Hitech BPO’s Pre-Export Checklist used as part of each edit.
FAQs on real estate photo editing
Yes, removing clutter, staging materials, etc. is completely legal. Misrepresenting defects; however, removing them can be considered illegal and expose the listing agent to liability.
HDR combines multiple low-light shots (using bracketing) to create a wider dynamic range but often produces halos and flat textures. Flambient combines an exposed shot of a house (interior) w/ a flash lit shot (interior surfaces) which captures much nicer, more realistic shadowing.
It also eliminates the halo effect that is common with HDRS when used for interior photographs. Generally speaking, for interior photos taken with both exterior light (windows) and interior light (artificial) Flambient provides a better result.
Use your M key to activate the Masking tool in Lightroom. Using the Masking tool, isolate just the window area. Reduce the Highlights to -80 and whites to -60 within the masked window area.
To correct overexposure on exterior windows simply shoot a dedicated exposure of the window and then composite it into your original using a luminosity mask in Photoshop. Use your “j” key in Lightroom to check if there are still any clipped areas remaining.
Lightroom for batch processing edits to include white balance, tone mapping, and overall color consistency. Adobe Photoshop for object removal, luminosity Masking, HDR composites, etc. Luminar Neo for AI-based sky replacement.
While most pro editors will utilize all three applications, they’ll typically use Lightroom for their first pass at correcting a large group of images and Photoshop for complex one-off corrections.
Standard outsourcing packages (typically 10-30 images per listing) should return from an experienced partner within 1 business day (24 hours). More complicated jobs (ie: virtual staging, sky replacement, large volume jobs) could potentially take up to 2 days.
As a comparison, performing in-house photo editing for real estate with similar volume would take approximately 20-40 min/image and 15-45 min/QA depending on how well organized you’re able to stay during that time.
Want to transform your listings into assets with expert photo editing?
Snehal Joshi spearheads the business process management vertical at Hitech BPO, an integrated data and digital solutions company. Over the last 20 years, he has successfully built and managed a diverse portfolio spanning more than 40 solutions across data processing management, research and analysis and image intelligence. Snehal drives innovation and digitalization across functions, empowering organizations to unlock and unleash the hidden potential of their data.
What’s next? Message us a brief description of your project. Our experts will review and get back to you within one business day with free consultation for successful implementation.
Disclaimer:
HitechDigital Solutions LLP and Hitech BPO will never ask for money or commission to offer jobs or projects. In the event you are contacted by any person with job offer in our companies, please reach out to us at info@hitechbpo.com
To provide the best experiences, we use technologies like cookies to store and/or access device information. Consenting to these technologies will allow us to process data such as browsing behavior or unique IDs on this site. Not consenting or withdrawing consent, may adversely affect certain features and functions.
Functional
Always active
The technical storage or access is strictly necessary for the legitimate purpose of enabling the use of a specific service explicitly requested by the subscriber or user, or for the sole purpose of carrying out the transmission of a communication over an electronic communications network.
Preferences
The technical storage or access is necessary for the legitimate purpose of storing preferences that are not requested by the subscriber or user.
Statistics
The technical storage or access that is used exclusively for statistical purposes.The technical storage or access that is used exclusively for anonymous statistical purposes. Without a subpoena, voluntary compliance on the part of your Internet Service Provider, or additional records from a third party, information stored or retrieved for this purpose alone cannot usually be used to identify you.
Marketing
The technical storage or access is required to create user profiles to send advertising, or to track the user on a website or across several websites for similar marketing purposes.